Tools needed
1. Cans that have a length of 13.3 cm diameter and 10 cm (cans
lubricants, milk cans, etc.
2. PCMCIA Card (if you use a laptop that has not been equipped
device Wi-Fi 802.11 b or 802.11 g) that have the antenna outside.
3. PCI W-Lan Card Wi-Fi 802.11 b or 802.11 g (for those who use
PC, the card is PCI slot to ditancapkan).
4. SMA connector (for connecting the cable connector with the Card
PCMCIA or PCI W-lan card, usually some type of PCMCIA
still using the pigtail connector with SMA, SMB, SMC or
5. Coaxial cable RG-58 that the length should not more than 15 meters.
6. N Plug connector (TNC Plug Connector RG 58 CRMPG) used for
connect to the cable.
7. N connector (TNC Connector seal chasis).
8. Mur and bolts (for attaching a connector to N Antenna cans).
9. Pipe brass plaque diameter 2.5 --- 4 mm, can
also use copper wire taken from the power cable.
From left right: SMA Connector, Plug RG 58 CRMPG TNC, TNC Socket
Other tools needed:
1. Hacksaw or knife to cut the container that is too long.
2. Ruler (rulers) to measure the length and width of cans.
3. Lakban (adhesive) to paste with a USB connector.
4. Pliers (tongs) to tighten the bolts mur.
5. Screwdriver (pengencang) to install the card with the motherboard.
Become more familiar
To further facilitate the purchase and connectors so that no one
select (know the price a bit expensive) then the image above in cut into pieces.
1. SMA Connector, plug the most sweet and most in demand difficulty
find it. Somehow I plug this one out very quickly
persediaanya in electronic shops. The price is Rp own. 11000; --
2. TNC Plug RG 58 CRMPG, which will be connected to the cable RG 58.
TNC socket seal chasis or N Connector. But ifseen from the shape does not have
similarity with the letter N.or this is not N Connector
4. Copper wire in the plug at the end of the TNC Socket seal chasis.
5. Mur and bolts (4 pairs, sorry, here there are only three) that
used to embed TNC Plug RG 58 CRMPG with cans
that does not quit.
Up preparation
1. Preparation equipment that is required is close to you and provide
all correctly.
2. Cut the length you if the cans still exceed 13.3 cm
using a saw or knife (if there is no hacksaw), and
make holes using a screwdriver or a knife if there is no drill
with distance from the edge (primary container) 4.4 cm.
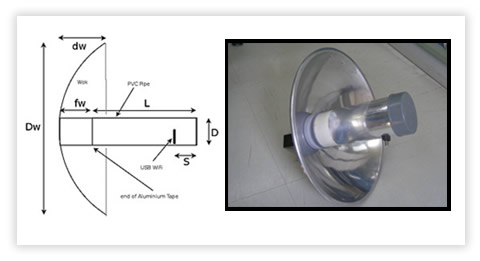
Size used
Here is the size that you can use to create the antenna
ans are taken from the site wire.less.dk2. But note that for
long cans are not here. You can use cans
that have more than the length of 100 mm without the need to cut.
To get a more appropriate size, you can use cantennator the software can be downloaded for free from the internet (use google and typing the keyword "cantennator".Here is a sample calculation using the cans berdiameter the 10 cm used in the 2.4 GHz frequency.
Note: replace the number that is 2.4 by default with the number 2.4(use commas). Then convert 10 cm to 100 mm, so that
calculation will result in long cans with 137.76 mm (13.7 cm), and the size of the cans to the back of the connector along N 45.92 cm (4.5
cm).
Way up the antenna
First (N Connector)
1. Take TNC Socket seal chasis or N Connector that has been
together with copper wire (31.5 cm in length) and the cans
that have been dilubangi.
TNC Socket 2.masukan seal chasis or N Connector that has been incorporated
with copper wire to the hole cans that have been prepared.
3. Tighten N Connector with cans using bolts and mur
use tongs or hands (if a strong hand
4. Final form of the work of the mur and bolts and penampakan
copper wire that has been installed.
Both (N Plug Connector)
the following steps to install a cable to the TNC Plug RG 58
CRMPG
1. Peeled first cable will be connected to the connector.
Note well, do not have to participate in fibrous cable entry
when entering into the cable to the connector.
2. The end result of the cable and the TNC to N Plug
Connector.
Third (SMA Connector)
This step is a final assembly step cans antenna, that is
combine cable with SMA Connector. Remember that the plug
SMA consists of three small objects (needles, bracelets and konektornya itself)
1. Enter first ring of steel cable with SMA connectors,
satukan with cable and connectors.
2. Input pin to the middle connector will be made as
to the WLAN Card. Try wrapping the needle is
to the edge connector for easy plug mecolokkan to
WLAN Card. Do not enter force with the needle to the connector if
indeed can not. Reduce cable to ease installation of hand
Caution:Be careful when pressing needle, because it can injure your finger-the finger
jarumnya a fine or broken.
3. If installed properly and fairly robust jarumnya,try pairs of SMA connectors with the connector end of the WLAN. When have been installed properly.
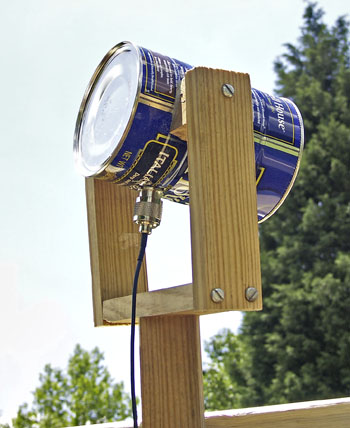
The end result of the work of making the antenna cans. Now it's time Plug and Play